How to Use a Pizza Oven: Step-by-Step Guide
Master how to use a pizza oven with our step-by-step guide. Learn firing techniques, temperature tips, and secrets for restaurant-quality pizza.

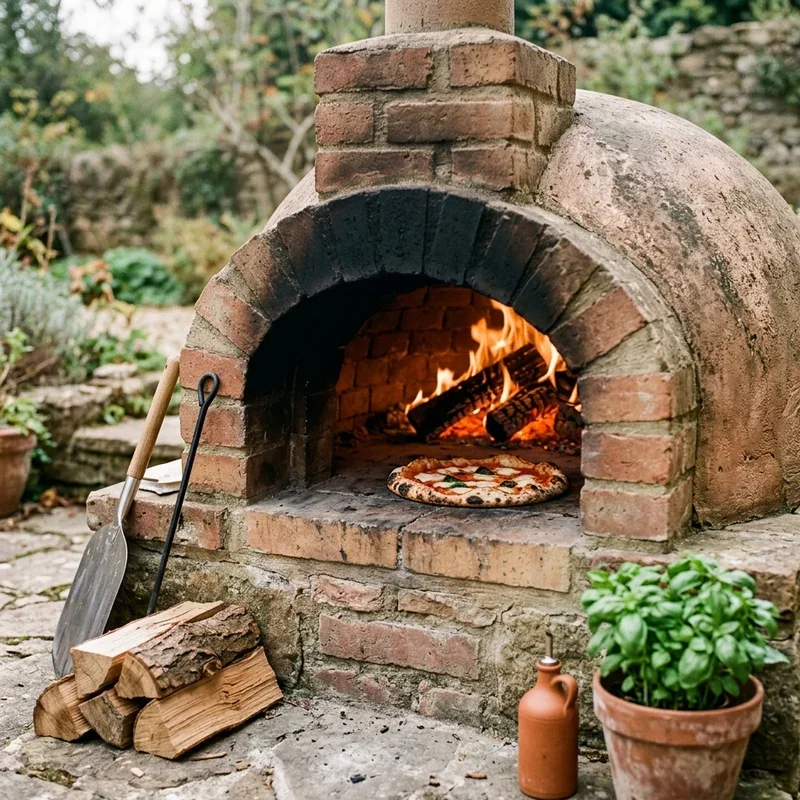
There's something almost magical about pulling a bubbling, perfectly charred pizza from a roaring hot oven. That leopard-spotted crust, the melted mozzarella stretching in gooey strands, and the aroma that makes neighbors suddenly appear at your backdoor. It's the stuff pizza dreams are made of.
So you've taken the plunge and invested in a pizza oven. Congratulations! But now that gorgeous piece of equipment is sitting there, and you're wondering how to actually transform it from an expensive lawn ornament into a pizza-producing powerhouse.
Here's the thing about pizza ovens. They're beautifully simple in concept but require understanding some basics before you'll be churning out Neapolitan masterpieces. Unlike your standard kitchen oven, these specialized cookers operate at extreme temperatures and behave in ways that might surprise first-time users.
Learning how to use a pizza oven step by step puts you on the path toward pizzeria-quality results right in your own backyard. Whether you've got a wood-fired beauty, a sleek gas model, or a compact countertop unit, this comprehensive guide covers everything you need to know.
Ready to become the neighborhood pizza legend? Let's fire things up.
Understanding Your Pizza Oven Type
Different ovens require different approaches, so knowing your equipment matters.
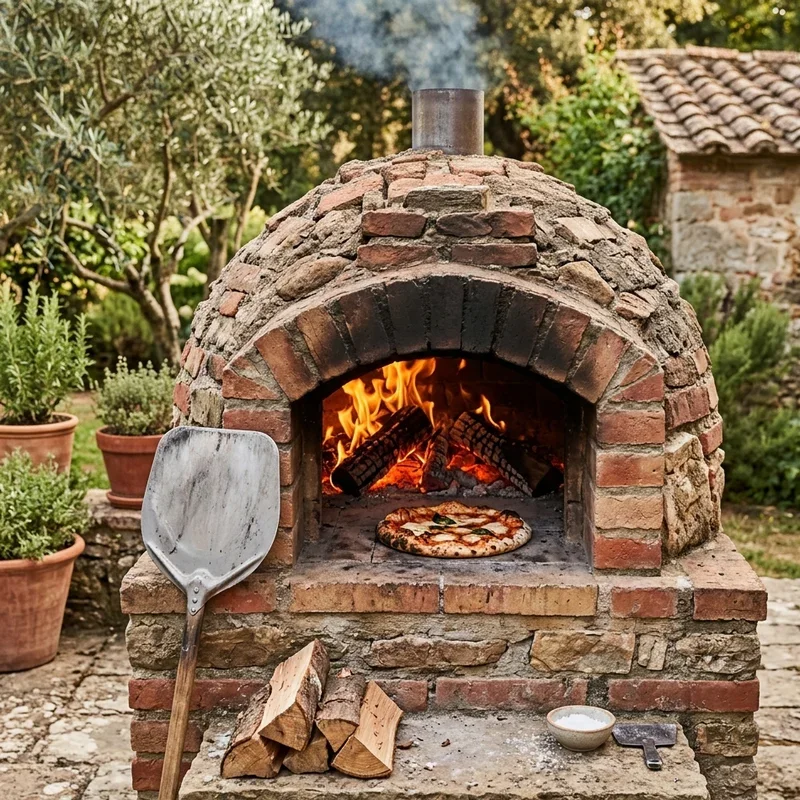
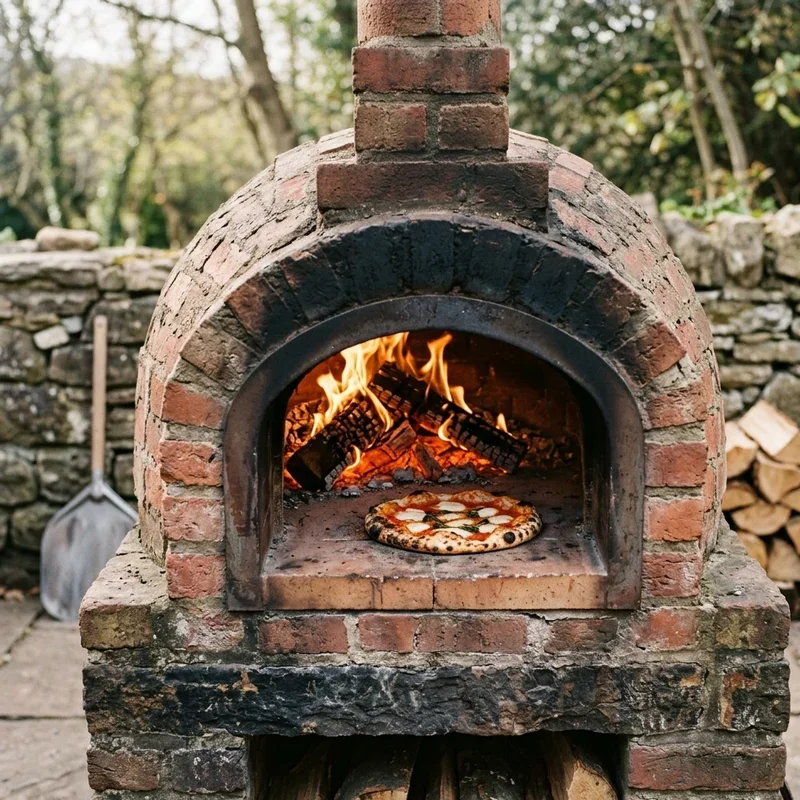
Wood-Fired Pizza Ovens
Wood-fired ovens represent the traditional gold standard for authentic pizza making with that unmistakable smoky flavor. These ovens use actual flames and burning wood to create both radiant heat from the fire and retained heat from the oven floor and dome. The learning curve is steeper than other options, but the results are absolutely worth the effort. Managing your fire becomes an art form that improves with practice. Temperature control happens through fuel management rather than turning dials, which feels wonderfully primal and satisfying.
Gas-Powered Pizza Ovens
Gas ovens offer convenience and consistent heat without the fire management skills wood-fired models demand. Simply turn a knob, and you've got reliable, controllable flames heating your cooking surface quickly. Many gas models reach pizza-cooking temperatures in fifteen to twenty minutes, compared to an hour or more for wood-fired alternatives. The trade-off involves sacrificing that authentic wood-smoke flavor, though some models include wood chip compartments for added smokiness.
Portable and Countertop Models
Compact pizza ovens designed for portability or countertop use have exploded in popularity recently. These units typically run on propane, wood pellets, or electricity, making them accessible to apartment dwellers and casual pizza enthusiasts alike. Despite their smaller size, quality portable ovens reach the high temperatures needed for legitimate pizza making. They're perfect for beginners learning the ropes before potentially upgrading to larger permanent installations.
How to Use a Pizza Oven: Step-by-Step Guide to Preparation
Success starts long before any flames get involved.
Gathering Essential Tools
Pizza making requires specific equipment that makes the entire process manageable and safe. A pizza peel, that large paddle-like tool, is absolutely non-negotiable for sliding pizzas into and out of the oven. An infrared thermometer takes the guesswork out of determining when your oven reaches optimal cooking temperature. Long-handled brushes help clean the cooking surface between pizzas. Heat-resistant gloves protect your hands and forearms from intense radiant heat. Having these tools organized and within reach prevents frantic searching while your oven blazes.
Preparing Your Dough and Toppings
Get everything ready before firing up your oven because once it's hot, you won't have time to prepare ingredients. Make your dough well in advance, allowing proper fermentation time for flavor development and texture. Prep all toppings, slice vegetables, shred cheese, and portion sauce into individual pizza amounts. The oven will be ready before you know it, and scrambling for ingredients while your fire burns down wastes heat and causes frustration.
Initial Oven Inspection
Before each use, give your oven a quick inspection for any issues requiring attention. Check that nothing has nested inside if the oven sits unused for extended periods. Ensure the cooking surface is clean and free from debris that could affect your pizza. Verify that any gas connections remain secure and leak-free if applicable. This pre-flight checklist prevents problems and keeps cooking sessions running smoothly.
Firing Up Your Pizza Oven
The fire-starting process sets the stage for everything that follows.
Wood-Fired Ignition Steps
Start with kindling and small pieces of wood arranged in the center of your oven floor. Use natural fire starters rather than lighter fluid, which can leave chemical residues and off-flavors. Light the kindling and gradually add larger pieces of wood as the fire establishes itself. Once flames are burning strongly, add full-sized logs and push the fire toward the back or side of the oven. The initial fire should be aggressive, with flames licking up toward the dome to heat the entire oven thoroughly.
Gas Oven Startup Procedure
Gas ovens simplify the startup process dramatically compared to wood-fired alternatives. Open the gas valve and ignite according to your manufacturer's specific instructions. Set the burner to high for the initial heating phase to bring temperatures up quickly. Most gas ovens feature temperature gauges or digital displays showing current heat levels. Watch these readings and adjust accordingly as your oven approaches pizza-cooking temperatures.
Preheating Time Requirements
Patience during preheating separates successful pizza makers from frustrated ones with undercooked, soggy results. Wood-fired ovens typically require forty-five minutes to an hour or more to heat properly throughout. Gas ovens preheat faster but still need adequate time for the stone floor to absorb heat fully. The floor temperature matters most for cooking pizza bottoms properly, and stones take time to heat through completely.
How to Use a Pizza Oven: Step-by-Step Guide to Temperature Management
Getting heat levels right makes or breaks your pizza outcomes.
Ideal Pizza Cooking Temperatures
Authentic Neapolitan pizza cooks at around 900 degrees Fahrenheit, blistering and charring in just ninety seconds. Home pizza ovens typically achieve somewhere between 700 and 900 degrees depending on the model. The floor temperature should register between 700 and 800 degrees for optimal crust development. Dome temperatures run hotter, providing the radiant heat that cooks toppings and creates those beautiful char spots.
Using Temperature Measuring Tools
An infrared thermometer becomes your best friend for accurate temperature readings. Point it at the cooking surface to check floor temperature before launching each pizza. Measure different areas of the floor since temperatures can vary across the cooking surface. Also check dome temperature to ensure adequate radiant heat for topping cookery. These readings inform your cooking strategy and help achieve consistent results.
Maintaining Consistent Heat
Keeping temperatures stable requires ongoing attention throughout your cooking session. Wood-fired ovens need periodic fuel additions to maintain adequate fire and heat levels. Add smaller pieces of wood regularly rather than waiting until flames die completely. Gas ovens maintain temperature more automatically but may need adjustment between pizzas. A well-maintained fire or flame produces consistent results across multiple pizzas.

Launching Your Pizza
Getting the pizza into the oven successfully requires technique and confidence.
Preparing the Peel
Dust your pizza peel generously with flour, semolina, or a combination of both before placing your dough. This prevents sticking, which leads to misshapen pizzas or disaster during the launch. Give the peel a test shake before adding toppings to ensure the dough slides freely. Some pizza makers prefer wooden peels for launching and metal peels for retrieval.
Building the Pizza on the Peel
Place your stretched dough on the prepared peel, working quickly to prevent sticking. Add sauce, cheese, and toppings swiftly and efficiently. Less is more when it comes to toppings since overloaded pizzas cook unevenly and become soggy. Give the peel another gentle shake to confirm everything still slides freely before approaching the oven.
The Launch Technique
Position the peel's edge at the spot where you want the pizza to land on the oven floor. Use a quick back-and-forth jiggling motion while pulling the peel backward in one smooth movement. The pizza should slide off and land flat on the hot stone surface. Practice makes perfect with this technique, so don't be discouraged by initial attempts that don't go perfectly.
Cooking and Turning Your Pizza
The actual cooking happens fast, requiring vigilance and quick reactions.
Initial Cooking Phase
Watch your pizza carefully as it hits the hot floor and begins cooking immediately. The edge closest to the fire will cook fastest, developing color and char within seconds. Bubbles will form on the crust surface as moisture turns to steam. The bottom should begin setting almost instantly on a properly heated floor.
Rotating for Even Cooking
Turn your pizza regularly to ensure even cooking across the entire surface. Use a small turning peel or the edge of your regular peel to rotate the pizza in quarter turns. Most pizzas require several rotations during their brief cooking time. Keep the pizza moving to prevent any section from burning while others remain underdone.
Knowing When It's Done
A finished pizza shows golden-brown coloring across the crust with charred spots scattered throughout. The cheese should be melted, bubbling, and beginning to brown in spots. The bottom, when lifted with a peel, should appear deeply colored with leopard-spotted charring. Total cooking time in a properly heated oven ranges from sixty to ninety seconds for Neapolitan-style pizzas.
Removing and Serving
The final steps complete your pizza-making triumph.
Safe Retrieval Technique
Slide your peel under the finished pizza quickly and smoothly, lifting it from the oven floor. Support the pizza fully on the peel to prevent floppy, drooping edges. Move confidently but carefully since you're handling extremely hot food near an even hotter oven. Transfer to a cutting board or serving surface immediately.
Resting Before Cutting
Allow your pizza to rest for thirty seconds to a minute before cutting. This brief rest lets cheese set slightly, preventing it from sliding off when sliced. The internal steam redistributes during resting, improving overall texture. Fighting the urge to cut immediately results in better eating experiences.
Keeping Multiple Pizzas Warm
When cooking for groups, keeping finished pizzas warm while making more becomes important. Position finished pizzas near the oven mouth where radiant heat keeps them warm without continuing to cook. Alternatively, a low conventional oven works for holding finished pizzas. Covering with foil helps retain heat though can slightly soften crispy crusts.
Cleaning and Maintenance
Proper care extends your oven's life and ensures hygienic cooking surfaces.
Post-Cooking Cleanup
While the oven remains hot, use a long-handled brush to sweep any debris, flour, or burnt toppings from the cooking surface. The heat helps burn off any residue. Never use water on a hot oven since thermal shock can crack stones and damage the structure. Allow complete cooling before any deeper cleaning.
Regular Maintenance Tasks
Inspect your oven regularly for cracks, damage, or wear that might affect performance or safety. Check seals and gaskets on gas ovens to ensure proper operation. Clear any ash accumulation from wood-fired ovens before it builds up excessively. Protect outdoor ovens from weather with appropriate covers when not in use.
Troubleshooting Common Problems
Even experienced pizza makers encounter issues occasionally.
Soggy or Undercooked Bottoms
This problem usually indicates insufficient floor temperature or too many toppings creating moisture. Wait longer for proper preheating and use an infrared thermometer to verify temperatures. Reduce topping quantities, especially wet ingredients like fresh tomatoes or watery vegetables.
Burnt Crusts or Toppings
Excessive charring results from temperatures too high or turning frequency too low. Rotate pizzas more frequently to prevent any section from overexposure. Move the pizza further from direct flame heat if available in your oven design.
Stuck Pizza Launch Failures
Dough sticking to the peel makes launching impossible and ruins pizzas before they even reach the oven. Use more flour or semolina on the peel surface. Work faster when assembling to prevent dough from absorbing flour and sticking. Test that the pizza slides before every launch attempt.
Conclusion
Mastering how to use a pizza oven transforms backyard cooking into an experience that rivals your favorite pizzeria. Understanding your specific oven type, managing temperatures properly, and developing launch and turning techniques leads to consistently excellent results. Practice builds confidence and intuition that makes pizza making feel natural and enjoyable. With patience and attention to the fundamentals covered in this guide, you'll be producing pizzas that make friends and family believe you've discovered some kind of culinary magic.
Read next: 15 Tiny Galley Kitchen Ideas to Maximize Small Spaces
Frequently Asked Questions
1.How long does it take to preheat a pizza oven properly?
Wood-fired ovens need 45-60 minutes while gas ovens typically preheat in 15-20 minutes fully.
2.What temperature should my pizza oven reach for cooking?
Aim for floor temperatures between 700-800 degrees Fahrenheit for authentic Neapolitan-style pizza results.
3.Can I use regular flour to dust my pizza peel?
Yes, though semolina or a flour-semolina combination provides better non-stick performance during launching.
4.How often should I turn my pizza while it's cooking?
Rotate quarter turns every 15-20 seconds to ensure even cooking and prevent burning in hot spots.
5.Why does my pizza crust come out soggy instead of crispy?
Soggy crusts usually result from insufficient floor temperature or too many wet toppings weighing down the dough.
Stay up to date with our latest ideas!